ffmpeg: error while loading shared libraries: libavdevice.so.52: cannot open shared object file

August 7, 2010    |   Posted by admin   |    Category: Linux Administration

The “loading shared libraries” error message is received when ffmpeg is not able to locate the file libavdevice.so.52.This happens when either the file is missing from the server OR ffmpeg is not looking at the path the file is in.

The ffmpeg command outputs the following error:

# ffmpeg
 ffmpeg: error while loading shared libraries: libavdevice.so.52:
 cannot open shared object file: No such file or directory

Solution:
Search the file libavdevice.so.52 on the server using the ‘find’ command

# find / -name libavdevice.so.52

The output will display the complete path to the file for example, /usr/local/lib/libavdevice.so.52 and you need to add the directory path “/usr/local/lib” in the ‘ld.so.conf’ file.

# vi /etc/ld.so.conf

and add the following at the bottom of the file

/usr/local/lib

Save the file and for the new changes to take effect, execute

# ldconfig
Comments Off on ffmpeg: error while loading shared libraries: libavdevice.so.52: cannot open shared object file

How to set OR enable Timestamp for the previously executed commands in Linux?

August 5, 2010    |   Posted by admin   |    Category: Linux Administration

Linux provides a command called “history” to view the previously executed commands on shell. By default, the “history” command display only the commands that were executed but not the date and time when they were executed.

To display the time and date of the previously executed commands, you need to set the “HISTTIMEFORMAT” variable. The variable has to be set in the users profile file so to take effect on each session.

To set the “HISTTIMEFORMAT” variable, SSH to your server and execute:

# export HISTTIMEFORMAT="[%F] [%T] "

You can also insert the above line at the end of the .bash_profile file

# vi /root/.bash_profile

Once the file is saved, open a new SSH session and execute the ‘history’ command to view the timestamp of the previously executed commands.

For example:

root@server [~]# history
 1068  [2010-08-05] [07:17:04] ps -auxf
 1069  [2010-08-05] [07:17:06] top c
 1070  [2010-08-05] [07:17:35] ll
 1071  [2010-08-05] [07:37:51] ls -la
 1072  [2010-08-05] [07:41:37] cat /root/.bash_profile
 1073  [2010-08-05] [07:41:47] cd

The commands in the above output is just an example.

How to Block Ftp Access/Port using iptables OR CSF?

August 1, 2010    |   Posted by admin   |    Category: Linux Administration

The default firewall of Linux is iptables which can be use to block Ftp access/port on your server. If you have a CSF firewall (which also use iptables), see section 2.

Section 1:  Iptables

Completely block Ftp access on the server:

# iptables -A INPUT -p tcp --dport 21 -j DROP

Block Ftp access for a specific IP address, say 11.12.13.14

# iptables -A INPUT -p tcp -s 11.12.13.14 --dport 21 -j DROP

Block Ftp access for a specific subnet

# iptables -I INPUT -p tcp -s 11.12.13.0/24 --dport 21 -j DROP

The rules need to be saved else they will be removed if the iptables service is restarted.

# service iptables save

Section 2: CSF

To completely block Ftp access, edit csf.conf file and remove port 21 from the TCP_IN list

# pico /etc/csf/csf.conf

To block Ftp access for a specific IP address, edit the csf.deny file

# pico /etc/csf/csf.deny

and place the following line

tcp:in:d=21:s=11.12.13.14

Save the file and don’t forget to restart the firewall.

Comments Off on How to Block Ftp Access/Port using iptables OR CSF?

How to check System Information and vendors of MotherBoard/Processor/RAM in Linux?

July 27, 2010    |   Posted by admin   |    Category: Linux Administration

dmidecode command can be used to check the system’s information and manufacturers of MotherBoard, Processor, RAM and other hardware of your Linux server. If the dmidecode command doesn’t work, install it using YUM.

Check your Linux server architecture i.e. 32bit OR 64bit:

# uname -p

Search for the dmidecode package

# yum search dmidecode

Depending on the architecture, install the proper dmidecode package

# yum install dmidecode

You are done. To check all the hardware information of the server, execute

# dmidecode
Comments Off on How to check System Information and vendors of MotherBoard/Processor/RAM in Linux?

How to find out CPU Utilization in Linux?

June 1, 2010    |   Posted by admin   |    Category: Linux Administration

There are various ways to check the CPU usage on a Linux server, like using top and ps commands OR by installing the sysstat package which includes sar, iostat, mpstat  commands to check the daily CPU usage on the Linux server.

CPU is the most important component in any server which is use to process all the tasks on your server. Whenever CPU is engaged in processing a specific task, it becomes unavailable for other processes. The other processes have to wait till the CPU is free thus creating a bottleneck in the system.

Using the following commands, one can track the:

  • Real time view of CPU utilization on the system
  • Utilization of each CPU on the system
  • CPU utilization of each running process
  • Average cpu usage since the last reboot

1) Top:
One of the common command in Linux to check the CPU usage is “top”. The top command provides a real time view of everything which includes CPU utilization, Memory utilization, running processes. To execute the command, just type “top”.

# top


The above output shows dynamic values of various CPU parameters like user, system, nice, idle, iowait.

2) PS:

The ‘ps’ command by default display the status of our terminal connection. ps offers various options to display the status of currently running processes. For example,

# ps -auxf

will display all the details of all the processes like User, PID, CPU/memory usage, the terminal it is executed from, the time and the process being executed.

You can use ‘ps’ command to sort out the high CPU utilization processes as well which in turn helps you to optimize your server in a better way. The option “eo” with ps is use to display contents field wise and then we can sort the generated output using ‘sort’.

# ps -eo pcpu,pid,user,args | sort -k 1 -r


  • Install SYSSTAT package to install different monitoring tools.

The other 3 commands to find out CPU utilization are
iostat
mpstat
sar

but they are not available by default.

In order to use the above commands, you need to install a monitoring package called “sysstat” using yum.

# yum install sysstat

Once ‘sysstat’ package is installed, start the service

# service sysstat start

3) IOSTAT:

The iostat command displays the average CPU usage since the last reboot. By default, the command without an option displays the average CPU usage and input/output stats of all the drives and their partitions. Execute

# iostat


To display the stats of CPU usage only, execute

# iostat -c


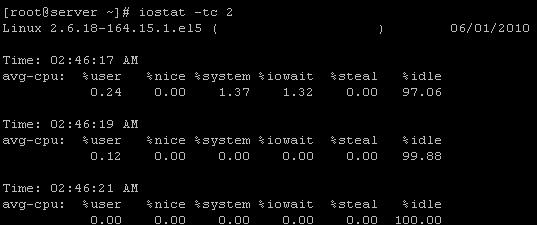
You may also want to display the CPU stats after every specific interval say, 2 seconds

# iostat -tc 2


4) MPSTAT:

mpstat command is use to display CPU usage of each CPU individually. By default, mpstat command without option shows the extended output of CPU usage. See below:

# mpstat


In order to display the usage of each CPU on the server, execute

# mpstat -p ALL


5) SAR :

sar command generates the stats for CPU usage, RAM usage and load average of the server and stores them in a file at regular interval. By default, the command without an option displays CPU stats of the current day.

# sar
 

One can also display the current CPU usage in specific time interval. The following command generates the output every 2 seconds for 3 times.

# sar -u 2 3


These are the ways to figure out the CPU usage on your system and then take appropriate steps to tackle CPU related issues.

Related Links:

How to check RAM/Memory usage in Linux?